
Made in America (NJ)
for your Wall Decor
Handcrafted Picture Frames

Your digital photos deserve better than a hard drive. They are moments of life, captured and curated, waiting to become tangible, professional-quality art. But we know the feeling. You've captured the perfect shot, but the thought of printing it brings up a dozen questions. Will the colors be right? Will it look blurry? What's the real difference between lustre and glossy, and how do you find a quality frame for a unique crop? The anxiety of turning a beloved digital file into a disappointing physical print is real.
This guide is your answer. By 2026, the world of online photo printing has evolved, and we're here to give you the expert knowledge to navigate it. We promise to show you exactly how to choose the right materials, understand resolution, and select archival-quality framing to transform your best images into museum-quality masterpieces that last a lifetime. Get ready to explore the latest in printing technology, demystify paper and finish options, and learn the secrets to a seamless process from upload to wall hanging.
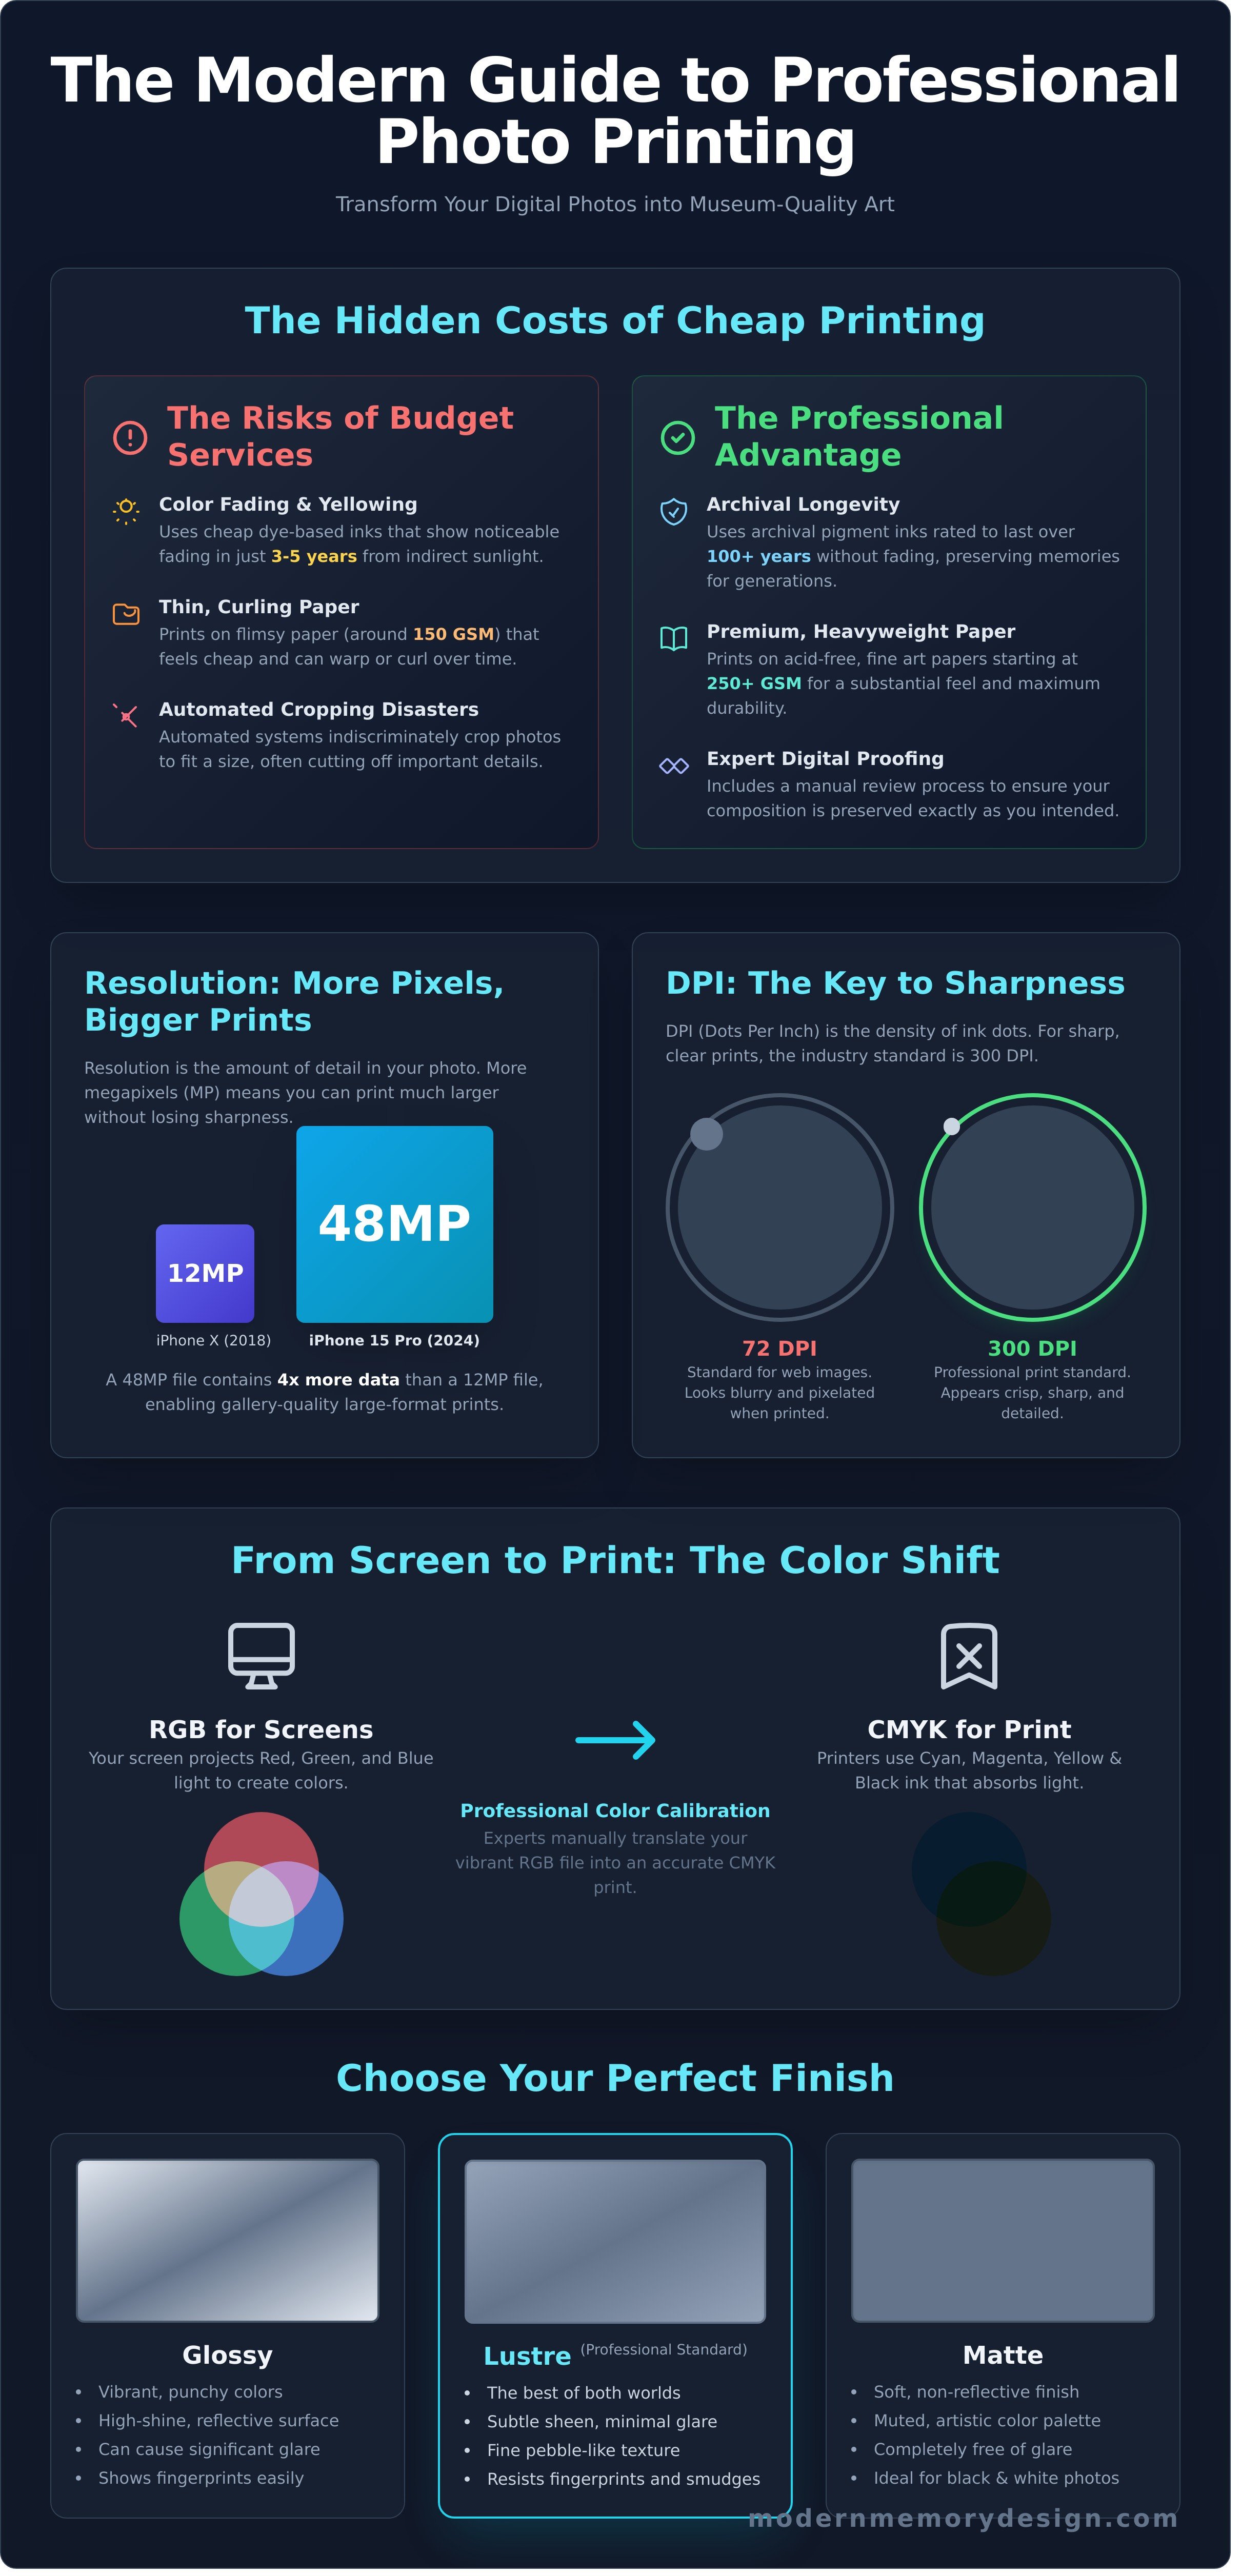
The modern service of online photo printing has evolved far beyond the one-hour kiosks of the early 2000s. Today, it represents a sophisticated ecosystem where your digital files are transformed into tangible, lasting art. At its core, the service uses a professional Digital printing process, but the real difference lies in the expert human oversight, professional-grade materials, and meticulous color management that separates a disposable print from a family heirloom. We've moved from an era of stuffing 4x6 snapshots into albums to an age where a single, stunning photograph becomes a 30x40-inch centerpiece in a living room.
A common point of frustration is when a printed photo doesn't match the image on your screen. This isn't your fault; it's a matter of physics. Your phone and computer screens create images using the RGB (Red, Green, Blue) color model, where light is projected outward. Printers, however, use the CMYK (Cyan, Magenta, Yellow, Black) model, where ink is applied to paper that absorbs light. A professional print shop manually calibrates its systems to translate your vibrant RGB file into a rich, accurate CMYK print, ensuring the final product matches your vision. Cheap automated services often skip this critical step, resulting in flat, disappointing colors.
The catalyst for this shift has been the exponential improvement in smartphone camera technology. The 12-megapixel sensor in a 2018 iPhone X was good; the 48-megapixel ProRAW files from an iPhone 15 Pro are gallery-quality, containing enough data for massive prints. This accessibility has fueled the print-on-demand movement for personalized home decor. More importantly, in an age of digital fragility, a high-quality physical print remains the only truly permanent backup for your most cherished memories. Hard drives fail, but an archival print endures.
Opting for the cheapest printing option often costs more in the long run. The shortcuts taken by discount printers directly impact the quality and lifespan of your photos. Here's what to watch for:
By 2026, choosing a quality-focused online photo printing service is an investment in both permanence and sustainability. Archival-grade materials not only protect your memories from fading but also reduce waste by eliminating the need for reprints. It's about transforming a fleeting digital moment into a physical object with a story and a future, handcrafted to last a lifetime.
Transforming a digital photo into a stunning physical print starts with understanding the language of your image file. The three most important terms are resolution, DPI, and aspect ratio. Getting these right is the difference between a crisp, vibrant memory on your wall and a blurry, disappointing picture. Don't worry; the technical details are straightforward once you know what to look for. We'll guide you through exactly what you need for professional, high-quality results.
First, let's talk about pixels. Resolution simply refers to the number of pixels that make up your photo. A photo that is 4000 pixels wide and 3000 pixels tall has a resolution of 12 megapixels (4000 x 3000 = 12,000,000). The more pixels you have, the more detail is captured and the larger you can print your image without it looking pixelated. For high-quality prints, the industry standard is 300 DPI, or "dots per inch." This means the printer will place 300 individual dots of ink within every inch of paper. A low DPI print (like 72 DPI, common for web images) will look blocky and fuzzy up close, while a 300 DPI print will appear sharp and clear.
You can easily find your photo's resolution to determine its maximum print potential. On an iPhone, open the image in the Photos app and tap the "(i)" icon to see the dimensions (e.g., 4032 x 3024). On most Android devices, open the photo in your gallery, tap the three-dot menu, and select "Details." To calculate your max print size at 300 DPI, simply divide the pixel dimensions by 300. For a 4032 x 3024 image, the largest high-quality print you can make is approximately 13.4 x 10 inches.
For precious, low-resolution family photos, modern AI upscaling software can sometimes intelligently increase the pixel count, making a larger print possible. However, for the best results, always start with the highest resolution file you have.
Have you ever tried to print a smartphone photo as an 8x10 and found that someone's head gets cut off? That's an aspect ratio issue. Your phone's camera likely shoots in a 4:3 or 16:9 ratio, while an 8x10 print has a 5:4 ratio. To make it fit, the image must be cropped. Our online photo printing uploader automatically shows you a preview of the crop, so you can adjust it perfectly before you order. Understanding these ratios helps you frame your shots with printing in mind.
The "sweet spots" for home wall art are often 11x14 and 16x20 inches. These sizes make a significant visual impact without overwhelming a room. A photo from a standard DSLR camera (3:2 aspect ratio) crops beautifully to a 16x20 frame with very little image loss. When preparing your file, remember that professional printing requires "bleed," an extra 1/8 inch of image printed on all sides that gets trimmed off. This ensures your color and image go right to the edge. The "safe zone" is the core area of your photo, where all critical elements like faces and text should be kept to avoid being trimmed.
Finally, the file format you choose impacts the final quality. For most situations, a high-quality JPEG (saved at 100% or level 12) is the perfect balance of quality and manageable file size. For large-format, archival prints where every detail matters, a lossless TIFF file is superior. Once you've chosen the right file format, the paper you print on is the next critical decision. For a deep dive, B&H Photo offers a helpful guide to photo paper finishes that explains the unique characteristics of lustre, matte, and glossy options.
The final step in bringing a digital photo to life isn’t just a click; it’s the paper it’s printed on. The texture and finish of your paper directly influence the mood and impact of the final image. A photo is more than just pixels on a screen. It’s a physical object, and the right paper choice transforms a simple print into a personal work of art that you can feel and appreciate for decades.
Your choice depends entirely on the photo's subject and where it will be displayed. Let's break down the three professional-grade standards.
Beyond traditional paper, our custom online photo printing services offer unique materials that transform your images into statement decor. A canvas print adds a classic, painterly texture, perfect for family portraits. For a sleek, industrial aesthetic, metal prints infuse dyes directly into aluminum, creating incredible depth and modern vibrance. Acrylic blocks give your photo a stunning 3D effect, making landscape colors appear almost backlit and luminous.
A beautiful print should last a lifetime. That's why we use museum-quality materials designed for permanence. True archival paper is "acid-free," meaning the destructive lignin found in wood pulp has been removed to prevent yellowing over time. We pair this with lightfast pigment-based inks, which are rated by Wilhelm Imaging Research to resist fading for over 100 years, unlike less stable dye-based inks. Finally, framing with 99% UV-protective glass or acrylic is essential to prevent sun damage and preserve your memory's color and clarity for generations.
Transforming a digital image on your screen into a high-quality physical print involves more than just clicking "upload." A photo that looks perfect on a backlit phone can appear dark or soft when printed on paper. Taking a few minutes to prepare your file is the single most important step to ensure the final product is a masterpiece you'll be proud to display. Our expert guide walks you through the simple adjustments that make a world of difference for your online photo printing experience.
First, let's address brightness and contrast. Your phone or computer screen emits light, making images appear naturally brighter than they are. A print, on the other hand, only reflects the light in the room. To compensate, a good rule of thumb is to increase your photo's brightness by 5-10% using any basic photo editor. A small boost in contrast, around 3-5%, will also help the details pop and prevent the image from looking flat.
Accurate color is the hallmark of a professional print. While your screen uses an RGB (Red, Green, Blue) color model, professional printers often use CMYK (Cyan, Magenta, Yellow, Black). Our advanced printing systems are expertly calibrated to translate your sRGB files with precision. However, you can ensure the best results by viewing your photo on a few different devices. If the red in a sweater looks orange on one screen and crimson on another, the truest color is likely somewhere in between.
Finally, consider your crop. A standard photo from an iPhone has a 4:3 aspect ratio, which doesn't fit neatly into traditional frame sizes like 8x10 (a 5:4 ratio) or 11x14. When you upload your image to our professional interface, it will show you exactly how the photo will be cropped to fit your selected size. Pay close attention to this preview. It's your final chance to adjust the composition and make sure you don't accidentally trim off a critical part of the memory you're preserving.
Your screen's backlight is why prints can look 20% darker than the digital file. Beyond a simple brightness boost, always apply a subtle sharpening filter before uploading. This counteracts the natural softening that occurs during printing. For black and white photos, don't just desaturate the image. Use a dedicated B&W conversion tool that lets you adjust the tonal values of the original colors, creating deep, rich blacks and brilliant whites for a truly striking result.
Once your photo is uploaded, you can refine its presentation. Adding a crisp white border, typically between 1 and 2 inches, can create a clean, contemporary look that often replaces the need for a traditional mat. Opting for our "Print + Frame" workflow is the most direct path to a perfect, ready-to-hang piece. Our experts will professionally mount your print to an acid-free backing, a crucial step that prevents the print from warping or waving inside the frame over time-a common issue with DIY projects.
Before you finalize your order, our system performs one last critical check. If your image resolution is too low for the size you've selected, a warning icon will appear. For a sharp 8x10 print, we recommend a file with at least 2400x3000 pixels. Heeding this warning ensures your final piece is crisp and clear, not pixelated. Ready to see your work come to life? Upload your prepared photo and start designing your custom frame today.
The standard process for online photo printing often ends with a delicate print arriving in a flimsy tube or cardboard mailer. You're left with the risky second step: finding a local framer or attempting a DIY project. Data from shipping carriers suggests that up to 10% of unmounted art prints suffer damage in transit, from corner dings and creases to moisture exposure. This multi-step process is not just inconvenient; it’s a gamble with your precious memories.
At Modern Memory Design, we eliminate that risk entirely. We combine professional printing and expert custom framing into a single, seamless service. You upload your photo, and we handle the rest. Your memory arrives not as a fragile piece of paper, but as a finished, ready-to-hang masterpiece, protected and perfected by our expert team.
We believe quality is found in the details. Our frames are handcrafted in our New Jersey workshop using solid wood moldings, a stark contrast to the plastic or medium-density fiberboard (MDF) used in mass-produced frames. An expert framer meticulously mounts your print, ensuring it's perfectly centered, free of dust, and sealed with professional-grade backing. The result is a durable, gallery-quality piece designed to last for generations, arriving at your door ready for the wall.
Our commitment to quality means we don't believe in "upgrades" for essential protection. Every single frame we build includes museum-quality components as the standard. This isn't an add-on; it's our baseline. You receive:
This all-in-one approach to online photo printing and framing also unlocks limitless creativity. You aren’t confined to standard sizes like 8x10 or 16x20. Need a unique 13.5x27.75 inch frame for a panoramic shot? We can build it to the exact 1/8th inch. With hundreds of frame styles, from Modern Sleek to Ornate Vintage, your vision is our blueprint.
Modern Memory Design bridges the gap between the trusted expertise of a local NJ frame shop and the convenience of a national online service. Every piece is built with passion and precision by our team in Hasbrouck Heights, New Jersey. We combine decades of hands-on framing experience with the best archival materials to deliver professional results directly to you, no matter where you are in the country. Don’t risk your memories on a two-step process. Let our artisans create a piece you'll be proud to display.
Ready to see the difference? Upload your photo and start your custom print and frame project today!
Navigating the world of digital printing in 2026 doesn't have to be complex. The path to a stunning print is clear when you master the fundamentals: dialing in the correct resolution for your intended size and selecting the perfect paper finish to match your photo's mood. These details transform the standard online photo printing experience into an act of true craftsmanship.
Why stop at just the print? Modern Memory Design elevates this process by combining professional printing with expert custom framing in one seamless step. Every piece is handcrafted with museum-quality archival materials in our New Jersey workshop, ensuring your memories are preserved for a lifetime. With Free Shipping on all orders, turning your digital files into tangible art has never been easier or more rewarding.
Ready to see the difference? Upload & Frame Your Favorite Memories Now. Your favorite moments deserve more than a digital screen; let's turn them into art you can cherish every day.
The best resolution for high-quality photo prints is 300 DPI (Dots Per Inch). This industry standard ensures your image will be sharp and clear without any pixelation. For example, to print a quality 8x10 inch photo, your digital file should be at least 2400 x 3000 pixels. Our website's upload tool will automatically check your file and warn you if the resolution is too low for your selected size.
Our process makes it simple. First, upload your favorite photos directly from your phone's camera roll to our website. Next, choose your print size and select a paper finish like lustre or glossy. Finally, browse our collection of custom, handmade frames to find the perfect match. Our expert team in New Jersey will then print, frame, and ship your gallery-quality memory right to your door.
The primary difference is the finish and reflectivity. Glossy prints have a highly reflective, shiny surface that makes colors appear vibrant and rich. However, they are more susceptible to fingerprints and glare. Lustre prints have a subtle satin-like finish that is less reflective. This professional-grade paper is more resistant to handling and minimizes glare, making it a popular choice for framed wall art.
It's not recommended to print a low-resolution photo in a large format. Enlarging an image with insufficient pixel data will cause it to look blurry, soft, or pixelated. A standard 1080 x 1920 pixel image from a phone screenshot, for instance, will print clearly at 4x6 inches but will lose significant detail if enlarged to 16x20 inches. We always suggest using the original, highest-resolution file available.
Most custom online photo printing and framing orders are handcrafted in our workshop and ready to ship within 4-6 business days. We take pride in our professional craftsmanship, ensuring every piece meets our quality standards. After your order ships from our New Jersey facility, standard ground shipping typically takes an additional 2-5 business days to arrive, depending on your U.S. location.
Your printed photos may look darker because phone screens are backlit and generate their own light, while a paper print only reflects ambient light. Most phone screens are set to over 75% brightness, which artificially enhances the image. Our professional printers are meticulously calibrated to reproduce the true color and exposure data within the digital file, giving you an accurate, life-like print.
The best choice depends entirely on the style you want to achieve. Photo paper provides a classic look with sharp, fine details and is traditionally protected behind glass. It's perfect for capturing crisp portraits and landscapes. A canvas print offers a more artistic, painterly feel with a unique textured surface. Canvases are often gallery-wrapped and displayed without glass, adding dimension and depth to your wall.
For a single, impactful piece of wall art, our most popular sizes are 16x20 inches and 24x36 inches. These dimensions are substantial enough to command attention above a sofa or bed. For creating a gallery wall with multiple images, customers often choose a mix of smaller sizes, with 8x10 inches and 11x14 inches being the most common selections to build a balanced and personal display.
{"one"=>"Select 2 or 3 items to compare", "other"=>"{{ count }} of 3 items selected"}
Leave a comment